Monday, December 24, 2012

Belphanior Home Automation System


I've been playing around with home automation as a hobby for quite a long time now. One thing I found frustrating was the lack of flexibility in the central controllers I've worked with. To that end, I'm pleased to introduce Belphanior, my own automation-oriented remote signalling and scripting system.

Belphanior is intended for a standard household setup (multiple computers and automaed systems behind a local intranet). Key to its design is a multi-process approach; the core of Belphanior is a communications protocol built atop HTTP and JSON, which allows a single "butler" process to coordinate and control multiple "servant" processes. This allows you to run the servants locally on the machines with the hardware that needs to be controlled. It's also designed to be self-documenting; "roles" (specific types of tasks servants can perform) are first and foremost human-readable, with the details of implementation left up to the creators of the servants. So an "output" role can be handled by a text-to-speech servant, a logger, a marquee-display controller, etc.

Belphanior's jumping-off point is at belphanior.net. There, you'll find a "getting started" guide and a list of the currently-implemented servants. Servants and the butler are available as open source under the MIT license, so if you wish to create your own, you are free to do so (and if you'd like to provide me a link to them, I'd be happy to post them on belphanior.net!).

A short list of things I've used Belphanior to do:

  • Turn the main lights off in the house at the end of the day (I'm terrible about leaving basement lights on when I go to bed).
  • Control Christmas tree lights and other seasonal home decorations to save power.
  • Drive the train under the Christmas tree every two hours (see "Making the Train Run On Time").
I'll be continuing to extend Belphanior and the home automation system as I go, and I'll be updating this blog with any fun developments.

Have fun, and happy hacking!

Thursday, December 20, 2012

Ten-minute Hack: Temporary Remote View

This one may not even require a whole ten minutes. I considered refraining from posting about it, but I've found it so useful in so many circumstances that I felt the need to share it.

While doing home automation work, I frequently find myself needing to control a process from one floor while observing it on another floor, or needing to observe events on multiple floors at once. For instance, I have a command that switches off all the lights in the house; I need to observe the basement and first floor simultaneously to verify it's worked. That's quite a bit of dashing up and down the stairs.

If you have two computers with embedded cameras (smartphone and desktop PC, laptop and tablet, smartphone and tablet), it's ridiculously simple these days to set up a simple video chat to remotely observe another room in the house. My tool of choice is Google+ Hangouts, but other applications with clients on all of your computers of choice would work just as well.

To set this up in Hangouts, all you need to do is start a hangout with nobody (I have an empty circle named "Nobody" for this purpose). Once the hangout is established on your first device, use the Google+ client on your second device and select your profile. You will see an entry for "hangout with 1 person." Join that hangout, and your two devices will be video-linked (you can add more if you so choose).

It's a pretty straightforward trick, but it's convenient if you have spare devices sitting around the home. In addition to using it to monitor home automation clients on different floors, I've used it to monitor a kitchen timer while I worked in a room too far from the kitchen to hear it (world's most expensive baby monitor, but I have a laptop and smartphone and no baby, so there you go!).

I hope you find this useful! Happy holidays.

Saturday, December 15, 2012

Making The Train Run On Time

I have a few INSTEON modules and a 2412N controller. I've been experimenting with home automation for awhile, and this year I thought I'd do something fun.

I unpacked the model train that goes under our family tree and connected the power box to an INSTEON lamp module. Using Belphanior, my not-quite-yet-fully-released home automation core, I wrote a short script that drives the train for a few seconds (timing is a little sloppy, as it takes several seconds for the 2412N to respond to HTTP requests from the 2412n servant, but it does the job).

"cycle train" script

With the script written, all I had to do was fire it every two hours. Fortunately, there is a Belphanior servant that can monitor an iCal-formatted calendar and notify the butler to run scripts in response to calendar events. I pulled up a Google Calendar that I keep for this purpose and populated it with a cycle of the train every two hours (except at night, to save power).

Belphanior calendar, showing "cycle train" command


The result is shown below. I'm pretty satisfied with it; simple, but effective!


Sunday, October 21, 2012

Ten-minute Hack: Bathroom Power

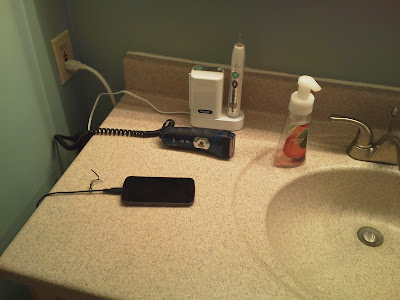
Electric toothbrush and electric razor plugged into two wall sockets, with a USB charger nearby, unable to plug in.

Is it weird to want more power sockets in the bathroom? I think not.

It's the twenty-first century. Between my wife's gadgets and my own, we usually have three or four devices fighting for the two sockets in the bathroom. Well, that changes tonight.

Preparation

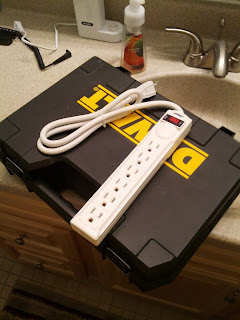
I happened to be in K-Mart today, and I picked up a simple six-socket power strip. Nothing fancy. Notably, it does have surge protection, which I figured was wise given that it'll be in the bathroom (I'm not really concerned about getting zapped if an accident occurs, though, because the wall socket itself has surge protection circuitry).

Six-socket power strip.
But key to this endeavor: The strip has two screw collars on the back. Bingo.

The back of the power strip, showing the two screw collars.
Honestly, the hard part was finding the screws to fit those collars. I have several screws of various sizes, but those collars have extremely tight tolerance. I needed a shallow head and pretty narrow shaft. I had to paw around for awhile in my screw box, but I finally found two that fit the bill.

Ten-minute Hack

This is an easy one. I slid the screws into the collars, positioned the power strip where I wanted it, and wiggled it around a bit to etch the screw tips into the wood. Now, I just have to whip out my trusty DeWALT and...
The gap between the wall and the sink cabinet. It's only eight inches.
... oops. Hard to tell in the photo, but that's only eight inches of clearance.

Okay! Quick change of tools: Papa Tomczak ages ago gifted me with a spare screwdriver, intended for computer repair. Turns out, it's just the right length and torque to fit this project, if I add a liberal amount of elbow grease.

T-handle screwdriver. Designed for computer work, but it's high-torque and short, perfect for this project.
In point of fact, I needed a lot of elbow grease. The side of the sink cabinet is some kind of pressed particle board, and it took some "oomph" to cut through the outer layer. Once I could get the screws to bite, though, they went in easy.

Then it was just a bit more elbow grease to get the collars to set back on the screws and...


Power strip mounted horizontally to the side of the sink cabinet, under the basin.

Now all of the bathroom's little electronic residents have a home. 

Final Thoughts

I might use some more velcro ties to pretty-up the loose wire between the power strip and the wall socket, but I'm overall pleased with the outcome.

Three devices plugged into the power strip: electric toothbrush, electric razor, and cellphone.

Saturday, October 20, 2012

Ten-minute Hack: Controlling the Wire Monster

It should be no big surprise that I have more than one loose wire running around the dashboard of my car. I actually have three: two USB micro cables to charge my cellphone and earpiece, and a stereo headphone cable to plug the phone into the AUX jack of my car (memo to self: next car... USB audio in or bust). These wires are not only unsightly, they're a snagging hazard with the cup-holders underneath them and a dog frequently in the car. It's neither fun nor safe to have your cellphone yanked into your lap by its charging cable while you're going at 45 MPH because your dog wanted to put a friendly paw on your hip to say "Hello."

I've been putting up with this rat-nest for awhile, but I finally decided this weekend to stop putting and start hacking. I put together a simple hack to tame the wire-beast on my dashboard. Excluding planning and part procurement, it took no more than ten minutes. Here's how it went down.

Preparation

As a first-pass solution, I grabbed some velcro ties (tip from Momma Tomczak: never run out of velcro ties) and gathered the wires into one coil. That was already an 80% solution, but I didn't like the idea of supporting the weight of the wires solely by their sockets (the audio wire in particular; I'm on my third one of those because they keep breaking from too much pressure at the point of contact into the radio).

Taking a look under my console, I learned that I was in luck: screws! Thank you, 2000 Honda Civic!
Camera shot of the under-side of the car console, showing two screws.

Taking a quick trip down to Lowe's, I browsed the hardware aisle for a few minutes and found my new favorite area: the hobby parts drawers (which are basically "Replacement parts for your Erector set"). I fished around and settled upon these little beauties: ⅜" Natural Nylon Clamps. Picked them up for a little over a buck and headed home.


Plastic bag containing Hillman nylon clamps.A single Hillman nylon clamp, showing its R-shape.

Ten-Minute Hack

There wasn't quite enough room to get the electric drill in between the cup-holders, gearshift, and lower console, so I settled for a manual screwdriver (actually, I, uh, manually used the screwdriver drill bit from my DeWalt drill... Don't tell my high-school mentors). I slipped the nylon clamps in between the screws and the console, and screwed them down until they felt solid. It should hold (which comes from the same engineering lexicon as the software test theory of "It Probably Works," but hey, ten minutes spent). Rather than thread the wires through the clamps, I threaded the velcro ties through the clamps to make it easy to swap out or rearrange the wires.

The wire harness installed, suspended from the nylon clamps. Underside-console view.The wire harness installed, suspended from the nylon clamps. Front-console view.

Final Thoughts

I'm pretty happy with how this turned out. Minimally-invasive, and it's really cleaned up the problem. There's a bit more slack in the cable leading to the AUX jack than I'd like, but the way to fix that is to find a right-angle headphone jack plug so I'm not extending an inch out of the radio unnecessarily. I'm confident that this solution should clean up my snagging issues.

One minor issue remaining is that when nothing is plugged into the charger or stereo cables, they don't stay in the cupboard easily and have a tendency to dangle. I may get a stick-on wire holder to affix to the left lower side of the console to stow those when they aren't in use, but that's a minor issue compared to having wires snake around my cup-holders continuously.

Yay, ten-minute hacks!
Completed project: Wires nicely stowed, and the wire harness sitting comfortably under the console.

Tuesday, August 7, 2012

Update to Frances's Tracing Game

Frances got a chance this weekend to play with her tracing game some more. She uncovered a bug I hadn't noticed in testing, and I noticed some trouble she was having. So I pushed an update.

Frame bug fix

A bit of inside-ball: under the hood, the traceable image is a custom View embedded in a LinearLayout, with the "gravity" on the LinearLayout set to center the embedded view horizontally and vertically. If Frances starts a trace by putting her finger down outside of the embedded view (i.e. inside the LinearLayout), the Android event system doesn't pass the event to the embedded view, so the trace doesn't get detected even as she moves her finger over the figure. This is perfectly understandable, correct by the UI standards, and 100% wrong for this application. I had to fish around a bit (there are a couple of options that look like they fix this issue and don't quite fit), but in the end the solution was to set the embedded view as the touch listener for the LinearLayout (i.e. embedded view implements OnTouchListener) and translate the coordinates from the LinearLayout's reference to the embedded view's reference using MotionEvent.offsetLocation.

Detect All Points

For simplicity, I'd been using only the first touch coordinate (the output of getX() and getY()) as the tracing location. However, watching Frances play the game, I noticed something about the way she holds the phone: rather than cradling the back, she usually grasps it from the side, which leaves her palm resting on the screen. Naturally, his plays havoc with the touch UI. Fortunately, the fix was simpler than the frame bug: I just read all the touch coordinates and try them all. If you put your palm on the image, that might count as a trace; I'm sort of fine with that, really.

Final Thought: On Users

Watching my niece play this game has been a great motivator for me to fix up the quirks. It's one thing to know you have thousands of anonymous users somewhere out in the world; it's quite another to have a two-year-old sitting in front of you straining her mind to try and understand a concept-breaking bug in the behavior of the program. The frame bug was driving her crazy, but she didn't want her uncle to do it for her; she was insistent on figuring it out herself. If she's going to be a trooper about it, the least I can do is clean up the last 2% of bugs in the toy.

By the time you read this, the latest version should be available on the Play Store. I didn't want to release just a bug update, so there's a couple of new figures in there too. Have fun!

Sunday, July 22, 2012

Frances's Tracing Game (or: How I Spent My Summer Vacation)

A black outline of a house with pink outlines indicating where tracing has occurred.
About the time my niece was first learning to walk, I showed her pictures of our dog on my Android. Within a few weeks, she was asking for the phone every time I stopped by. It was fascinating to watch how quickly she learned the basic controls, such as how to go back and forth in the photo roll and play movies.

I went fishing for some age-appropriate games to put on the phone, and found a couple. One of her favorites is Doodle Toy, a delightful little drawing game. She really enjoyed that, but at some point it went ad supported (not great in a toddler app).

Inspired by the time I taught her to draw circles in Doodle Toy, I played around for a few weeks in a very lackadaisical fashion and put together my first real Android App. It's a very simple tracing game; glide your finger over the black stencil to turn it pink. A little congratulatory sound cue plays when you trace the whole image, and the next one appears. There are only six images; no randomized order, and they loop forever.

Now that the project is done, I have some time to decompress and take stock. Here's a brief tour through the process: What I used, what went smooth, what got bumpy, and what I'd like to do in the future.

The Build Environment

Configuration of an Android project was pretty simple. I started at developer.android.com and basically followed the steps, the key ones being installation of the Android development environment and ant1.8. My primary machine was a Windows Vista box, but for the finishing touches I used a small laptop running Ubuntu Lucid Lynx 10.04. The Ubuntu box was actually a little quicker to set up (with the one exception of the need to switch in ant1.8 instead of the regular ant package; no need to build from source, just a different package). 

In lieu of using Eclipse, I opted for the command line tools and emacs. What I lost in autocompletion and refactoring support I'm pretty sure I made up for in portability, small footprint (I dread the notion of running Eclipse on my tiny laptop), and nearly-nonexistant garbage collection cycles in my IDE. 

The only other issue I ran into was a gotcha that multiple people have reported about the tool suite in Ubuntu: the first time you "ant installd," you're likely to get a permissions error because adb running as a user probably can't access the devices it needs to talk to your Android. The easiest (maybe not so secure ;) ) workaround is to sudo killall adb, then sudo adb devices to force the daemon to run (and stay running) in root. A maybe more secure and less hackish option is given here, but I haven't tried it.

Writing the App

The app is a bit of a hackjob, and it shows... Quite literally, as you can browse the source code here. There's a lack of division of interest (Traceview.java is pretty overloaded to do not just rendering and events, but state change from image to image also). I think there's a fine line one can walk between too much modularity and too much complication; the rule of thumb I use these days is to hack a solution in first, then refactor later. You'll also notice a lack of test cases; the project is simple enough that end-to-end testing takes about thirty seconds, so this hasn't been an issue. Topic for another day: I also find unit testing of essentially visual / event apps a real chore on most architectures, and I haven't yet gone looking to see if there's a clean tool for such things on Android.

One thing I'm pretty happy about is standardizing on SVG for the image format. It really freed me up in the test-and-iterate cycle, as I was able to lean on the svg-edit demo to do all my trace data. I'm pretty enamored with SVG for something this simple; the ability to pop back and forth between visual and text representation of the data turned out to be pretty awesome. I also lucked out and found this awesome SVG to Android Picture converter library, which is Apache licensed. I hacked some specific tweaks into it for my needs, but it was already a 95% fit for my project and saved me the drudgery of hooking up an XML parser (which, I'm told, causes the death of a kitten every time it's done).

Apart from those bits, the only fiddly pieces were the code that senses touch drags and applies them to the image. I originally put a lot of effort into making only the endpoints of a tracing "hot," so you had to trace contiguously. Observation of my niece playing the game showed that it was not only hard to get right, it was irritating to use and placed unneeded restrictions on the player---after all, she's not angling for a high score, she just wants to turn the image pink, and if she wants to do that by squeegeeing with her finger like she's cleaning a window, maybe I should get out of her way! YAGNI.

(There's a future treatise on "Games vs. Toys" here, but it's a story for another day. Suffice to say, I wish I'd remembered the lesson I learned watching her play when I was naming the project, because I should have called it "Frances's Tracing Toy").

Things I Liked

  • The documentation on Android is very decent. It walked me through most of the fiddly bits and platform-specific pieces. I walked through the "hello world" cat example and went from there. Anything I couldn't immediately glean from the documentation, I was able to find in the blogging community and stackoverflow.com.
  • The test-and-iterate cycle is pretty dang short with my phone plugged in. It's smart about the details, like quitting the app if there's already an instance running.
  • The resource abstraction is a pretty good abstraction, and the way resources bind into the code layer is extremely convenient. I ran into a couple of tiny issues where I had behavior in the wrong place in the Traceview code that crashed because it was being run at resource-loading time and tried to touch nonexistant resources, but that was an easy issue to diagnose and solve.
  • Publishing flow to the Play Store was pretty much a breeze. I paid my dues and churned out art assets using svg-edit, Paint.NET, and Gimp. The "promotional" shots I screen-grabbed from the phone itself (Thanks, screenshot hard-button!).
  • One program, compatible with 1,318 device configurations according to the Play Store. Awesome!

Issues

  • The aforementioned device issues on Linux. But that can probably be filed under "Every experience I've ever had plugging a new hardware device into a desktop Linux machine."
  • I tried to get cute by centering my trace object using layouts instead of rolling my own offsetting code for the event and rendering handlers. It ought to work, but it got fidgety; I had to force both a re-render and a re-layout of the containing view as well as the child view (it appears that resizing a child doesn't necessarily trigger a repaint for the child's old position rectangle in the parent, though to be honest I didn't track down the exact details). There's still a squeaky little bug in the interactions between parent and child layers, and I'm sadly increasingly convinced that it hasn't been worth it to try and shortcut writing my own centering code by using the layout engine.
  • I got very weird behavior when I tried to specify the <uses-sdk android:minSdkVersion="15"/> rule in my manifest (as that was the only system I'd tested on): the toy broke utterly (played sound but drew only a white background and nothing more). This was very unexpected behavior, and I haven't yet tracked down a root cause. As a result, I set my minSdkVersion to "1", and I'm hoping I don't get too many bugreports from people who's Android phone was made by cavemen is a bit older.
  • My program is ostensibly compatible with 1,318 device configurations. That's... a lot more than I have access to for testing purposes. I've tested, in fact, on a grand total of one phone. It's a bit freaky to think about all those people who are going to be using this toy on a hardware config for essentially the first time... On the other hand, that's half the fun of PC development, right?

Future Ideas

There's plenty of places I can take this in the future, if I feel like it (and since the code's public, so can you! Just buy me a coke some time if you end up making a mint off of your version ;) )

  • More shapes! My niece's parents have already asked for numbers and letters. I could have fun with that. :)
  • Fading from a sketch outline to a full-color version when you complete a picture.
  • Suppression of the menu bar and soft controls, with a "parent access" secret to get you back to the rest of the phone (personally, I wouldn't recommend letting a toddler have a phone all to herself anyway, but if this offers peace-of-mind to some parents, I could probably make it a thing).
  • Usability tweak: Currently, the event listener does the simplest thing and takes the first-index touch point when detecting a touch. But one thing I've noticed about little users is that they aren't great at balancing the phone yet and tend to grip from the side, meaning there's often a little palm touching the screen providing a false reading. I bet I can work around that if I index through all the touch points. :)

Go Have Fun!

I hope you enjoy the game! If you have any comments, feel free to post them on the game's Play Store page itself. If you have comments for me though, feel free to post them here, or come find me on Plus. I'd love to hear from you!